Set Up Team AI Spend Controls on OpenRouter
OpenRouter ·

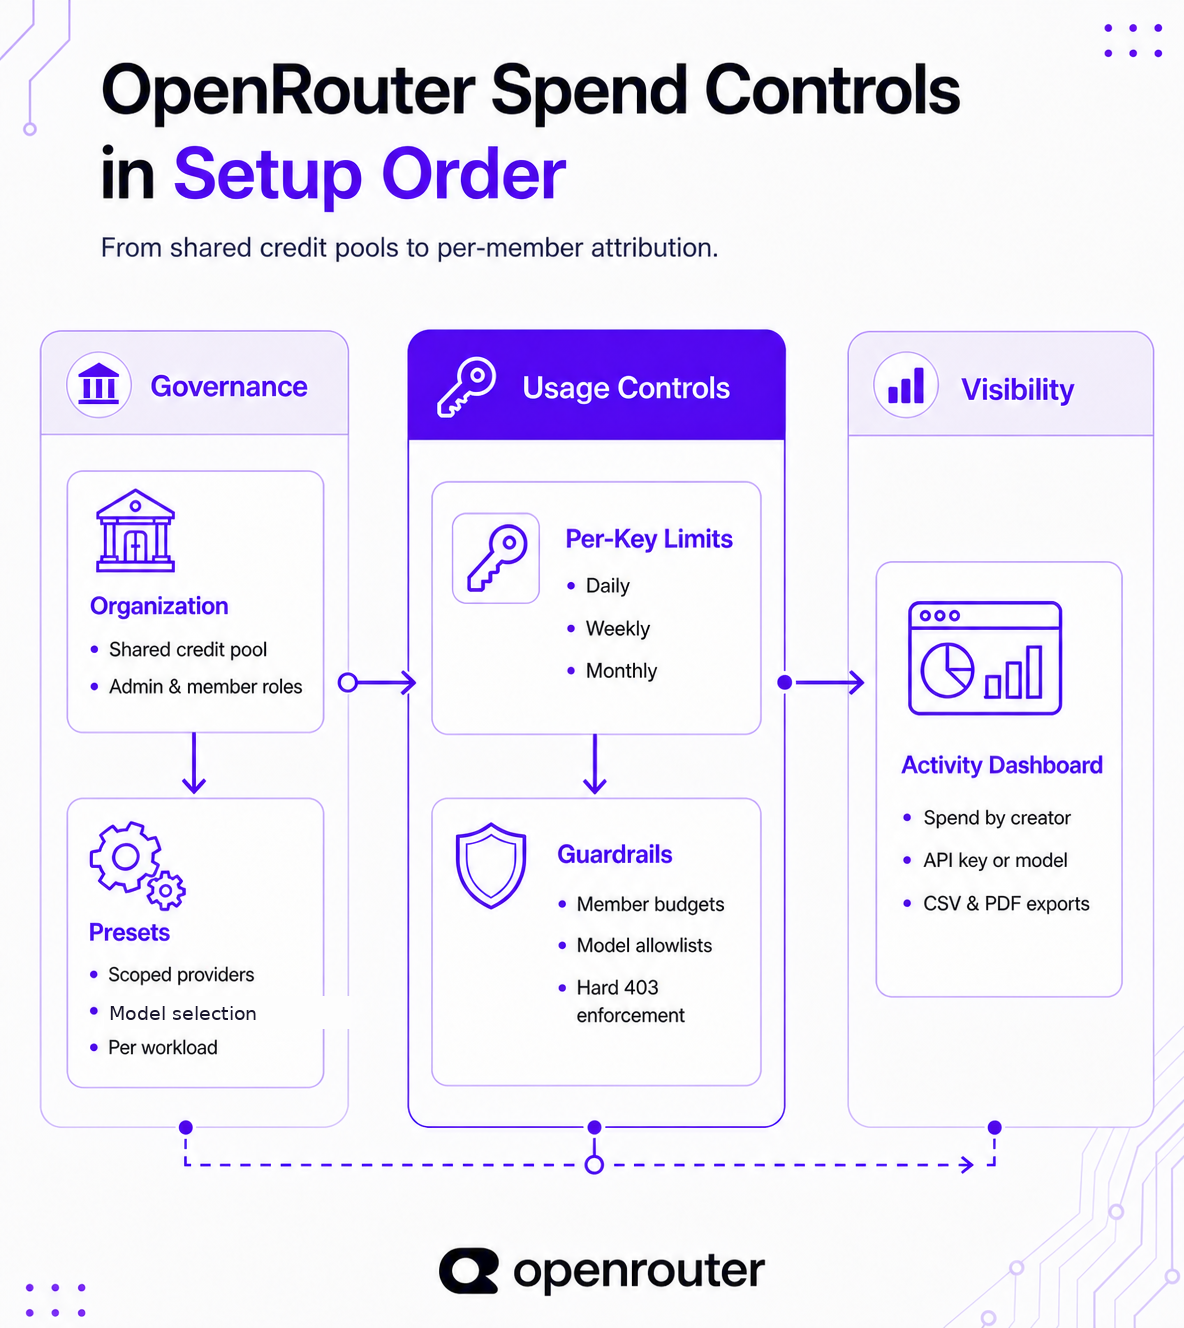
As your team grows on OpenRouter, more API keys and broader model access make it harder to see who is spending what. Five controls fix that. An organization gives everyone one shared credit pool. Presets scope models per workload. Per-key limits cap spend per key. Guardrails enforce per-member budgets and model allowlists. And the Activity dashboard shows where the money went.
This guide sets them all up, in order: organization, presets, key limits, guardrails, then a check in Activity. If you’re still deciding which controls you need, read the governing team AI spend guide first. This page covers the setup itself.
Before you start
Make sure you have the following in place before you begin:
- Use an account with a verified email (organization creation requires email verification).
- Complete the setup as an organization admin so you can manage billing, API keys, member access, and guardrails.
- Plan your member list in advance. Organizations support up to 10 members by default, with higher limits available through support.
- Review pricing with your team. Pay-as-you-go has no minimum spend, and the 5.5% platform fee for standard pay-as-you-go accounts applies when you buy credits, not per request. See Pricing.
Step 1: Create your organization and pool credits
Go to Settings > Preferences, open the Organization section, and click Create Organization. After entering your organization details, invite team members and switch into organization context using the org switcher at the top of the app.
Confirm the switcher shows your org name before you proceed. In a personal account, usage, API keys, and credits belong to your individual account. In organization context, they belong to the shared organization account. The org switcher is a common source of usage attribution errors.
Billing permissions depend on the role assigned to users during invitation:
- Admins can purchase credits and view billing information.
- Members can use organization resources and create API keys, but can’t purchase credits or access billing details.
Fund the shared credit pool
Purchase credits from the billing page while you’re in organization context. Credits go into one shared pool that every API key in the organization draws from, so you fund the team once at the center instead of topping up per engineer.
If you need to move existing personal credits into the organization, use the transfer option on the credits page. Transfers have eligibility rules (two-factor authentication on your account, account and membership age, recently purchased credits, and cooldowns between transfers), so if a transfer isn’t available yet, the page tells you why. Organizations billed by invoice can’t receive transfers.
Step 2: Scope models and providers with presets
A preset is a reusable configuration that pins which model and providers a workload uses. On organization accounts, presets are shared across all members.
Create the preset
Go to Presets Settings and create a preset per workload path, for example support-bot, internal-search, or eval-runner.
For each preset:
- Choose one model or a fallback model array.
- Configure provider routing preferences with
sort. - Apply provider include/exclude rules.
- Optionally set
system,temperature, andtop_p. - Save with a stable slug.
Presets are versioned, with each save designated as the new active version that API requests resolve to, and version history is kept so you can roll back. Request-level parameters shallow-override preset values.
| Preset control | What it does |
|---|---|
| Model selection | Keeps workloads on the intended model families |
| Fallback array | Keeps requests working during provider or model outages |
| Provider routing (sort) | Routes by latency or cost, whichever you prioritize |
| Provider include/exclude | Restricts execution to approved providers |
| Prompt and generation params | Keeps output style and variance consistent |
Reference the preset from code
Reference a preset in three ways: as the model with @preset/{slug}, via a separate preset field, or as model@preset/{slug}. All three resolve server-side, so the same preset works from any SDK.
const resp = await fetch('https://openrouter.ai/api/v1/chat/completions', {
  method: 'POST',
  headers: {
    Authorization: `Bearer ${process.env.OPENROUTER_API_KEY}`,
    'Content-Type': 'application/json',
  },
  body: JSON.stringify({
    model: '@preset/support-bot',
    messages: [{ role: 'user', content: 'Summarize this ticket.' }],
  }),
});
When you create or update a preset through the API, only the configuration fields are stored, such as model, temperature, top_p, provider, system, and tools. Transient fields like messages, input, prompt, and stream are ignored.
A preset only affects requests that explicitly reference it. If you need a model restriction that a key can’t bypass, use a guardrail model allowlist in Step 4 instead.
Step 3: Cap spend per key with limits and resets
You can cap each API key with a credit limit and a limit_reset, so every workload gets a fresh allowance on a recurring schedule. You create and manage these keys through a Management API key, which exists only for key administration.
Create a Management API key
Go to Management Keys and click Create New Key.
A Management API key handles administrative operations, such as key management under /api/v1/keys and guardrail management under /api/v1/guardrails. It can’t call completion endpoints, so it’s safe to use in provisioning systems and automation pipelines. Use it to create one key per service, environment, or engineer, so access and spend stay separate per workload.
Configure limits, resets, and lifecycle controls
When creating or updating a key via /api/v1/keys, you control both the spending cap and how it resets:
| Field | What it sets |
|---|---|
limit | Credit cap for the key |
limit_reset | daily, weekly, or monthly (daily resets at midnight UTC) |
disabled | true disables the key immediately |
include_byok_in_limit | Whether BYOK spend counts toward the limit |
Create a key with a daily credit cap:
const res = await fetch('https://openrouter.ai/api/v1/keys', {
  method: 'POST',
  headers: {
    Authorization: `Bearer ${process.env.OPENROUTER_MANAGEMENT_KEY}`,
    'Content-Type': 'application/json',
  },
  body: JSON.stringify({
    name: 'support-bot-prod',
    limit: 25,
    limit_reset: 'daily',
  }),
});
Update a key to tighten the cap or change the reset period:
const res = await fetch(`https://openrouter.ai/api/v1/keys/${keyHash}`, {
  method: 'PATCH',
  headers: {
    Authorization: `Bearer ${process.env.OPENROUTER_MANAGEMENT_KEY}`,
    'Content-Type': 'application/json',
  },
  body: JSON.stringify({ limit: 15, limit_reset: 'weekly' }),
});
Disable a key immediately to stop spend or cut off a misbehaving workload:
await fetch(`https://openrouter.ai/api/v1/keys/${keyHash}`, {
  method: 'PATCH',
  headers: {
    Authorization: `Bearer ${process.env.OPENROUTER_MANAGEMENT_KEY}`,
    'Content-Type': 'application/json',
  },
  body: JSON.stringify({ disabled: true }),
});
Monitor usage and automate governance
Each key reports its own usage through the fields usage, usage_daily, usage_weekly, usage_monthly, limit_remaining, and their BYOK equivalents. You can poll these from a cron job or background worker and disable a key as it approaches its cap.
The limit field caps the key, not the person. When you need enforcement across all keys belonging to a member, use a member-assigned guardrail in Step 4. For key rotation and secret hygiene, see the API key management guide.
Step 4: Enforce a per-member budget and model allowlist with a guardrail
A guardrail enforces policy at the person level, no matter how many API keys a member creates. It turns Step 2’s model defaults and Step 3’s per-key caps into hard limits that members can’t bypass. Only organization admins can create and manage guardrails.
Create the guardrail
Go to Settings > Privacy, scroll to Guardrails, and click New Guardrail.
Configure the following:
- Budget limit: Set a USD cap with a daily, weekly, or monthly reset. Requests over the cap are rejected with a 403.
- Assignment scope: Assign to an org member (covers all their keys and chat sessions) or to a specific API key (adds an extra layer on top). Only one guardrail is directly assigned per user or key.
- Model and provider allowlists: Only models and providers on the list are permitted. Everything else is blocked, even if a key tries to request it. Leave a list unchecked to allow all.
- Optional safety controls: Zero Data Retention (ZDR) per model group, prompt injection and jailbreak detection, Sensitive Information (PII) redaction or blocking, and custom regex content filters.
Use the eligibility preview to see the effective restrictions before you assign.
How per-member budgets behave
Guardrail budgets are enforced per-user and per-key, not shared across the team. Give 3 members a $50/day guardrail, and each gets their own allowance: Alice hits $50, and her requests are blocked while Bob and Carol each still have their own $50. A member’s spend across all their keys accumulates to that member’s total.
When both a key-level limit and a member-level guardrail apply, the lower limit wins. This is the tight per-member budget that the per-key limit alone can’t give you.
How policies compose when multiple guardrails apply
| Layer | How it resolves |
|---|---|
| Model and provider allowlists | Intersection: only what all rules allow is permitted |
| Zero Data Retention (ZDR) | OR per model group |
| Sensitive information controls | Blocking wins over redaction |
| Budgets | Evaluated independently per-user and per-key; lower limit wins |
Manage guardrails programmatically
You can also update a guardrail with a Management key via PATCH /api/v1/guardrails/{id}:
curl -X PATCH https://openrouter.ai/api/v1/guardrails/$GUARDRAIL_ID \
  -H "Authorization: Bearer $OPENROUTER_MANAGEMENT_KEY" \
  -H "Content-Type: application/json" \
  -d '{
    "limit_usd": 50,
    "reset_interval": "daily",
    "allowed_models": ["anthropic/claude-sonnet-4.6", "openai/gpt-4o-mini"],
    "allowed_providers": ["anthropic", "openai"]
  }'
Allowlists take exact model slugs, not wildcards, so they need upkeep as your model policy changes. And there’s no warning before a budget runs out. Users just get a 403 when a request is blocked. For when to use guardrails versus key-level limits, see governing team AI spend.
Step 5: Read team spend in the Activity dashboard
Open Activity and read the three metric cards (Spend, Tokens, and Requests). Set the time period (1 Hour, 1 Day, 1 Week, 1 Month, or 1 Year), then group:
- Creator shows spend per member.
- API Key maps spend to the workloads you capped in Step 3.
- Model shows which models are consuming the most budget.
In organization context, the Activity feed shows usage metadata for all members, including model, cost, and timing, and can be filtered by API key. Prompts and responses are never stored. You can also export data from the Options dropdown by selecting Export and choosing CSV or PDF.
OpenRouter reports usage in three places, and they answer different questions:
| Surface | Purpose | Where |
|---|---|---|
usage object | Per-response token and cost data on every API response | API response body |
usage_* key fields | Time-windowed totals for a single key | GET /api/v1/key |
| Activity dashboard | Spend, Tokens, Requests; grouped and exportable | openrouter.ai/activity |
BYOK spend shown in Activity is estimated using provider list prices and may differ from your negotiated discounts.
Verify your setup
Before you hand the organization over to your team, run these four checks:
- Make a call through a preset (
@preset/{slug}) and confirmusage.costcomes back in the response. Every response includes theusageobject automatically. - Confirm a capped key’s
limit_remainingdrops after a call viaGET /api/v1/key. - Send a request that violates a guardrail (over budget or off the model allowlist) and confirm it returns a 403.
- Open Activity, group by Creator, and confirm spend maps to the correct member.
Setup is done when requests outside the allowlist return a 403 and the Activity dashboard shows each member’s spend under their name.
FAQ
How do I track AI spend across my team on OpenRouter?
Create an organization so all usage bills to one shared credit pool, then open the Activity dashboard and group by Creator to attribute spend per member. In organization context, the activity feed shows every member’s usage metadata (model, cost, timing); prompts and responses aren’t stored.
Can I set a spending limit on an OpenRouter API key?
Yes. When you create or update a key via the Management API at /api/v1/keys, set a limit (the credit cap) and a limit_reset of daily, weekly, or monthly. Daily limits reset at midnight UTC. The limit caps that key, not the person who holds it, so 5 keys at $20 each let one engineer spend $100 a day.
How many people can be in an OpenRouter organization?
Organizations are capped at 10 members by default. Contact support if you need more. Only admins can purchase credits or view billing, while members create keys and use org resources. All org-key usage draws from one shared credit pool.
Can organization members see each other’s usage?
Yes, the usage metadata. In organization context the Activity feed shows every member’s model, cost, and timing data, and you can filter by API key or group by Creator to attribute spend per person. Prompts and responses are never stored, so the feed carries spend and usage data, not content.
Can I restrict which models my team can use?
Yes, in two ways. A preset sets a default model or fallback list for traffic that references it via @preset/{slug}, but a key can skip the preset and call any model directly. A guardrail model allowlist is a hard restriction per member or per key, and any request outside the allowlist returns a 403 regardless of preset. Use a guardrail when you need enforcement, not just a default.
Can I cap how much one person spends per day?
Yes. Assign a guardrail budget to an org member, and each member gets their own daily, weekly, or monthly allowance. They’re blocked with a 403 when their combined spend across all their keys hits the cap. The per-key limit caps a key, not the person, so use a member-assigned guardrail for a true per-person budget.
Do you have to pay for OpenRouter, and is there a minimum spend?
No. Pay-as-you-go has no minimum spend, and a free tier exists. The platform fee is 5.5% on credit purchases for standard pay-as-you-go accounts, and we don’t mark up provider pricing, so the catalog price is the model cost. See Pricing for current tiers and fees.
How do I see my OpenRouter usage?
You can see usage in three places. Every API response includes a usage object with token counts and cost. GET /api/v1/key returns per-key usage fields you can poll from code. And the Activity page shows Spend, Tokens, and Requests, with grouping and CSV or PDF export.