openrouter:image_generation server tool. The text model rewrites vague user requests into detailed image prompts, then calls the tool. You get better images from a single API call.
Outcome: A reusable preset slug (@preset/your-slug) that any app can call like a model. The user sends “make a watermelon hippo,” and the text model crafts a detailed visual description (materials, lighting, composition, style) before generating the image.
Before you start
You need:- An OpenRouter API key (for creating the preset and making requests)
- A decision on which text model orchestrates (rewrites prompts) and which image model generates
How the pattern works
A standard image generation call looks like this: your user says “make a watermelon hippo,” and the image model gets exactly that. The result is decent but literal, because the image model has no creative direction. The difference is visible. Here’s the same concept, with and without prompt enhancement:| Bare prompt: “make a watermelon hippo” | Preset-enhanced prompt |
|---|---|
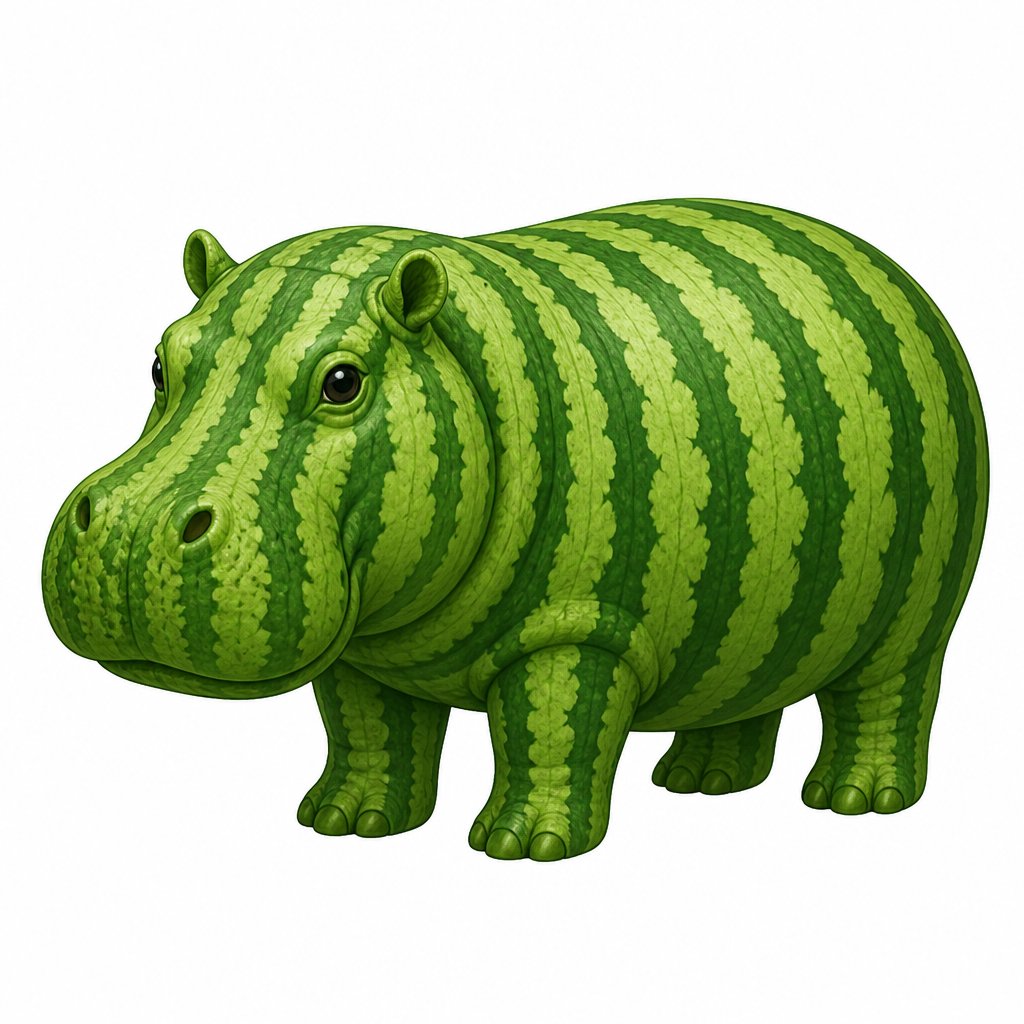 | 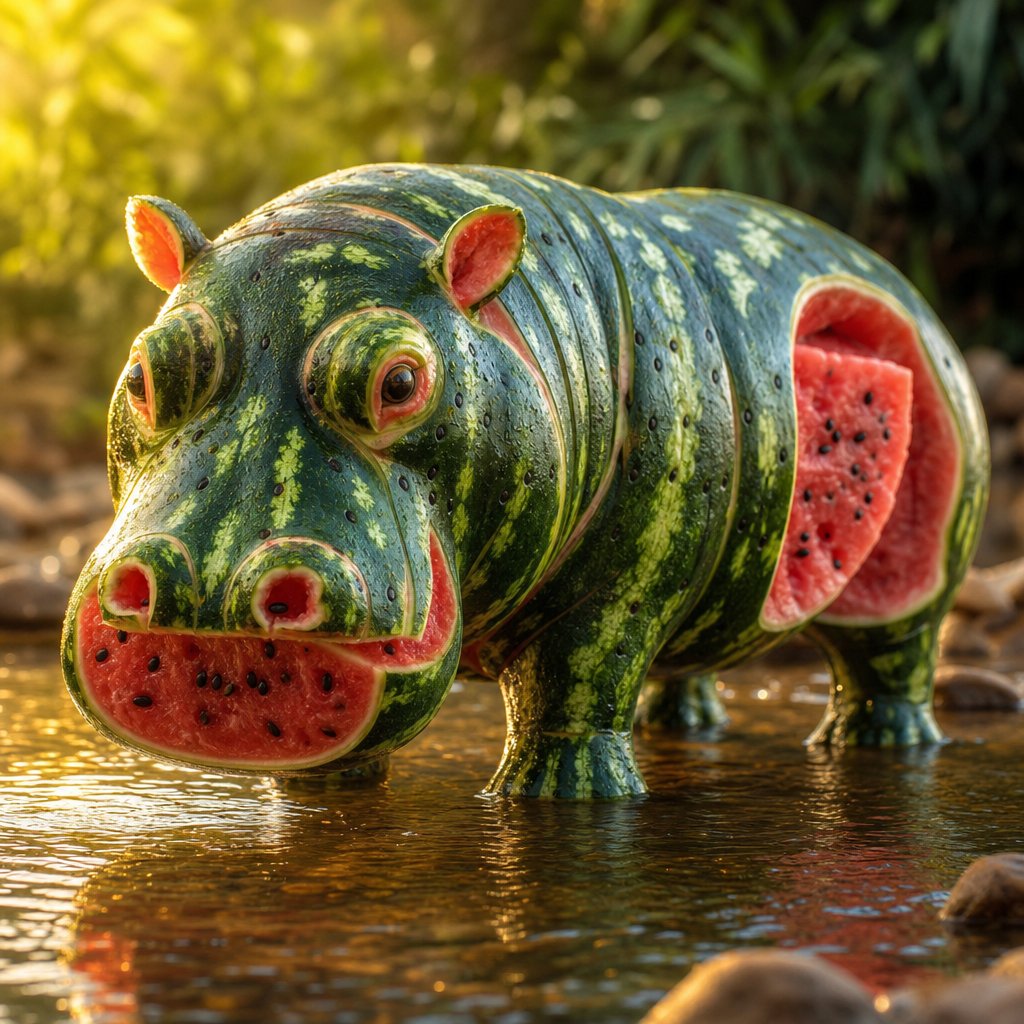 |
- User sends “make a watermelon hippo” to
@preset/your-slug - The text model (guided by your system prompt) rewrites it into something like: “A photorealistic hippopotamus sculpted entirely from watermelon rind and flesh, dark green outer rind with lighter stripes forming the body, exposed sections revealing vibrant pink-red watermelon flesh, black seeds dotting the surface like natural skin texture, standing in a shallow river at golden hour, warm sunlight catching water droplets on the glossy rind”
- The text model calls
openrouter:image_generationwith the enhanced prompt - OpenRouter generates the image and returns the URL to the text model
- The text model responds with the image and (optionally) explains what it created
Step 1: Create the preset via API
The fastest way to create the preset is to POST a request body to the preset creation endpoint. This captures the model, system prompt, tools, and parameters in one call:The response shown above is abbreviated. The full response includes additional fields like
workspace_id, description, and timestamps. See the Presets API reference for the complete schema.Step 2: Use the preset
Send requests to your preset slug as if it were a model:What comes back
The response looks like a normal chat completion. The text model’s message contains the generated image URL (typically as a markdown image or inline URL) plus any commentary it added:Customization
Choosing the orchestrator model
The orchestrator rewrites prompts and decides when/how to call the tool. Good picks:| Priority | Model | Why |
|---|---|---|
| Speed + cost | openai/gpt-4.1-mini | Fast, cheap, good at instruction following |
| Creative quality | anthropic/claude-sonnet-4 | Strong at nuanced creative interpretation |
| Maximum quality | anthropic/claude-opus-4.8 | Best creative reasoning in the Opus family, 1M context |
Choosing the image model
Configure the image model in the tool’sparameters.model field. google/gemini-3.1-flash-image (Nano Banana 2) is a strong default: fast, cheap ($0.50/M input), and high quality. See available image models for all current options and pricing.
Tuning the system prompt
The system prompt controls how aggressively the orchestrator rewrites. Some patterns:- Faithful expansion: “Expand the user’s request with visual detail while preserving their stated intent. Don’t override their style choices.”
- Brand-consistent: “All images should use our brand palette (navy #1a1a2e, gold #e6b800, cream #faf0e6). Apply a clean, modern illustration style.”
- Domain-specific: “You are generating product photography prompts. Focus on lighting setup, background material, camera angle, and product placement.”
Image tool parameters
The tool’sparameters object accepts model plus all image_config fields (quality, aspect_ratio, size, background, output_format, output_compression, moderation). See the image generation server tool reference for the full list and model-specific defaults.
Using different image models for different scenarios
The image model is fixed per preset (the orchestrator can’t switch it mid-request). Create separate presets for different quality tiers and let your application pick the right one.Updating the preset without redeploying
One of the key benefits: change the image model, tune the system prompt, or adjust parameters from the Presets dashboard or via the API. No code deploy needed. Your application keeps calling@preset/image-enhancer and picks up the new config immediately.
To create a new version via API, POST to the same endpoint again with your updated config. The latest version becomes active automatically.
Next steps
- Explore available image models and compare pricing, quality, and speed
- Read about presets for version management, team sharing, and the preset field merge behavior
- Use the OpenRouter TypeScript SDK or Python SDK for typed preset interactions in your app
- Add web search to the preset’s tools so the orchestrator can reference current visual trends or specific art styles
- Track image generation costs with the Analytics guide to monitor per-preset spend
- Handle multi-turn conversations where the user refines images iteratively (pass previous messages to the preset to maintain context)